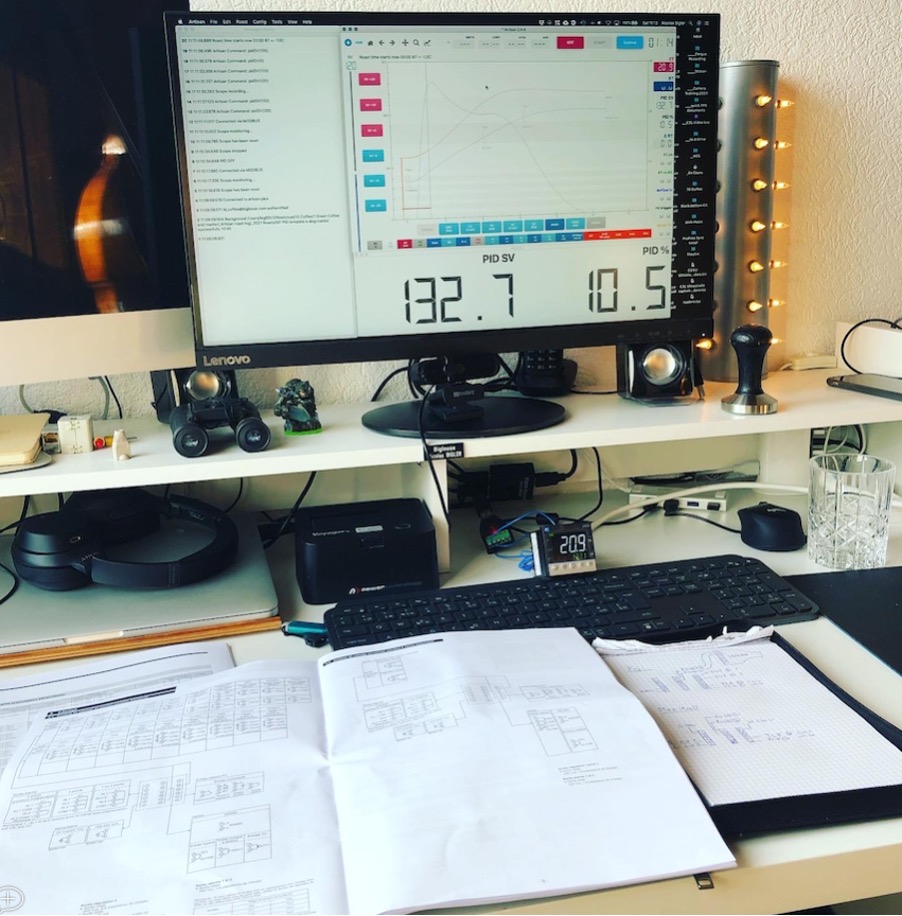
Just before I start. This post is not an electronic experts article. It is more my experience from a “roasters for dummies” point of view as I make improvements to my roaster, hopefully it can help other dummies.
I understand (mostly) the topics around temperature control, yet I am neither an electronic engineer nor a computer programmer. I am fortunate enough to have many users and contributors on the Artisan web site and its mailing list who have been helping me to get my new PID working (Special Thanks to Marko and Frans). Hopefully by describing the process from a beginner’s perspective, I can help other beginners achieve the same.
Enjoy
---
The “set-up”
I roast on an old fluid bed roaster by Neuhaus Neotec (Model 1999 Signum L).
It is a sample roaster which only had manual control (temperature and airflow).
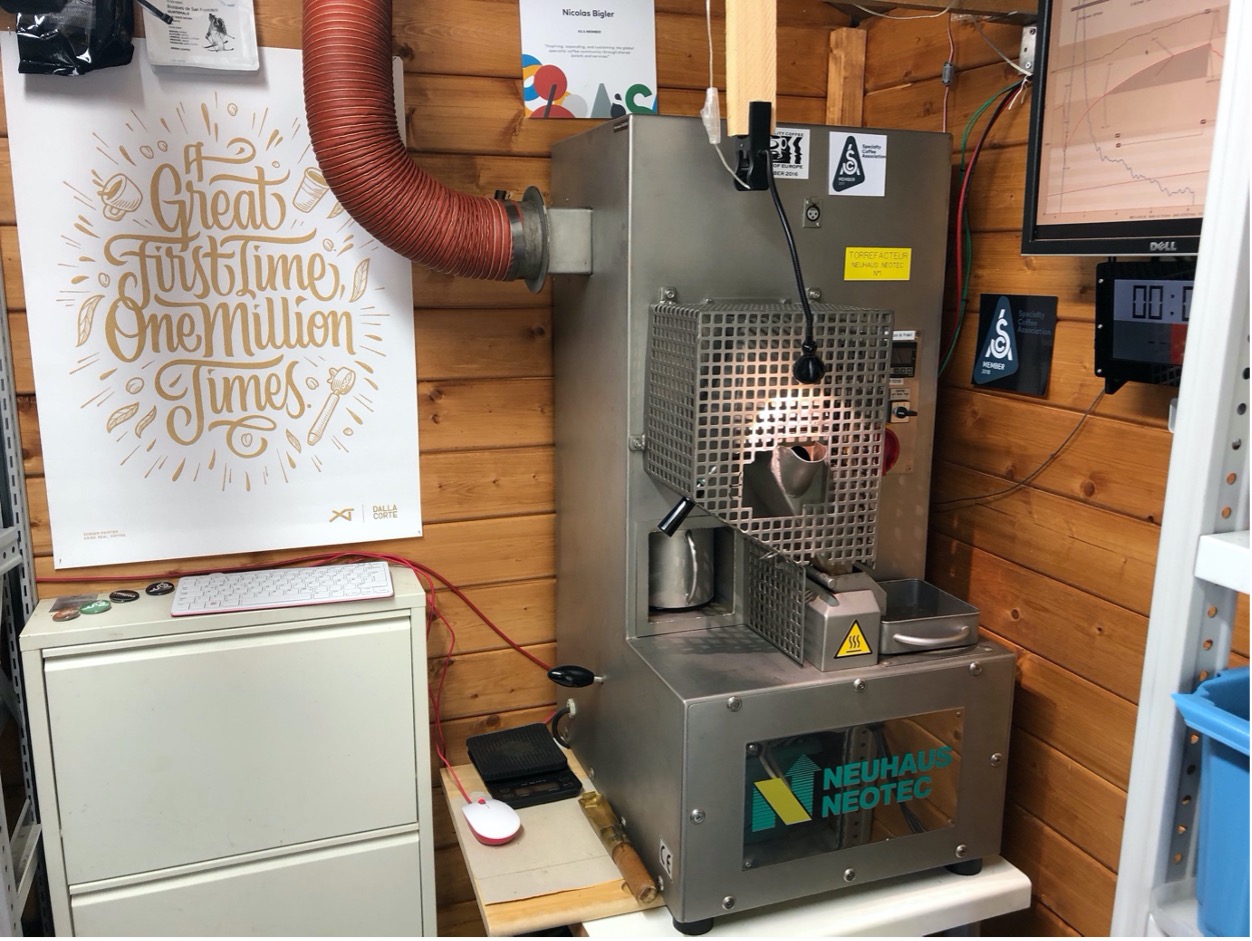
The Signum L Roaster located in my garden shed
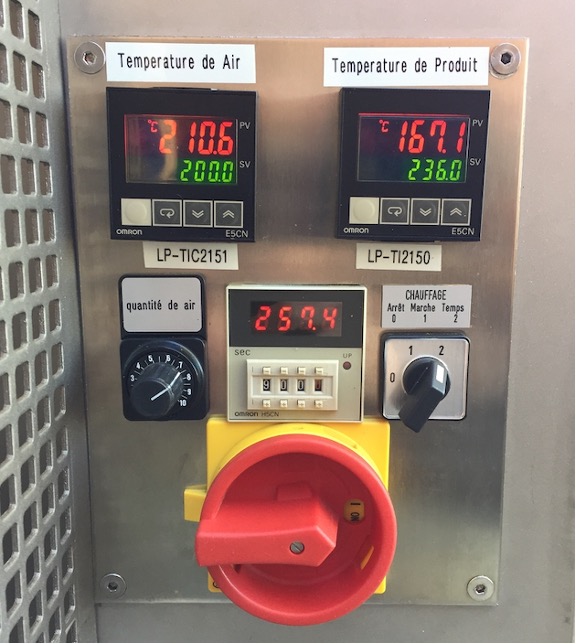
The control panel of the roaster
I have been using the roaster with Artisan since 2016. Initially I started by using an Amprobe TMD-56 to measure ET and BT, and after a while I upgraded to a Phidget 1048 to be able to measure different parameters.
My roaster is located in my garden shed, taking my laptop out with me to roast was a little annoying so I decided to use a Raspberry Pi (initially a 3b and now a Model 4).
Over time I have added a few more Phidgets to measure Ambient conditions, and Phidget 1035 to give an airflow value using the voltage signal on the back of the potentiometer which controls airflow on the front of the roaster. It only reads the value, so no control function yet. I am planning in the “near” future to add a switch on the roaster to bypass the potentiometer and control the airflow from Artisan probably using the Phidget OUT1002 (voltage output). I will post more about that in due time.
I also improved the BT reading by replacing the original 1mm thermocouple to a RTD PT100 3mm based on Marko’s great article “On Idle Noise”.
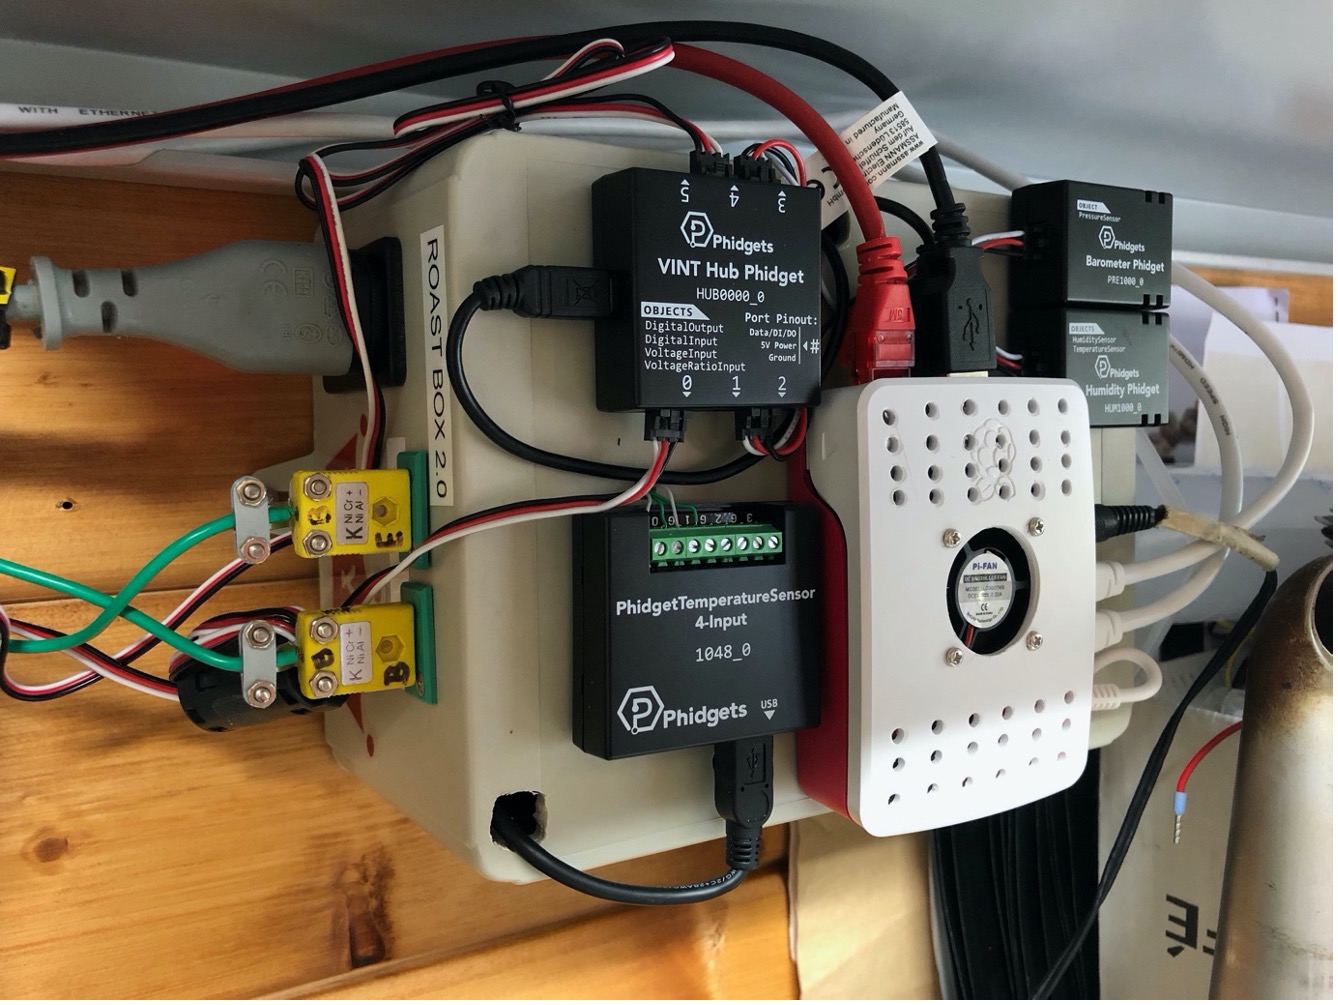
The “RoastBox” with the Raspberry Pi and Phidgets
Now, getting to the point of this post. The other thing that I have been wanting to do for years was to control the temperature directly from Artisan.
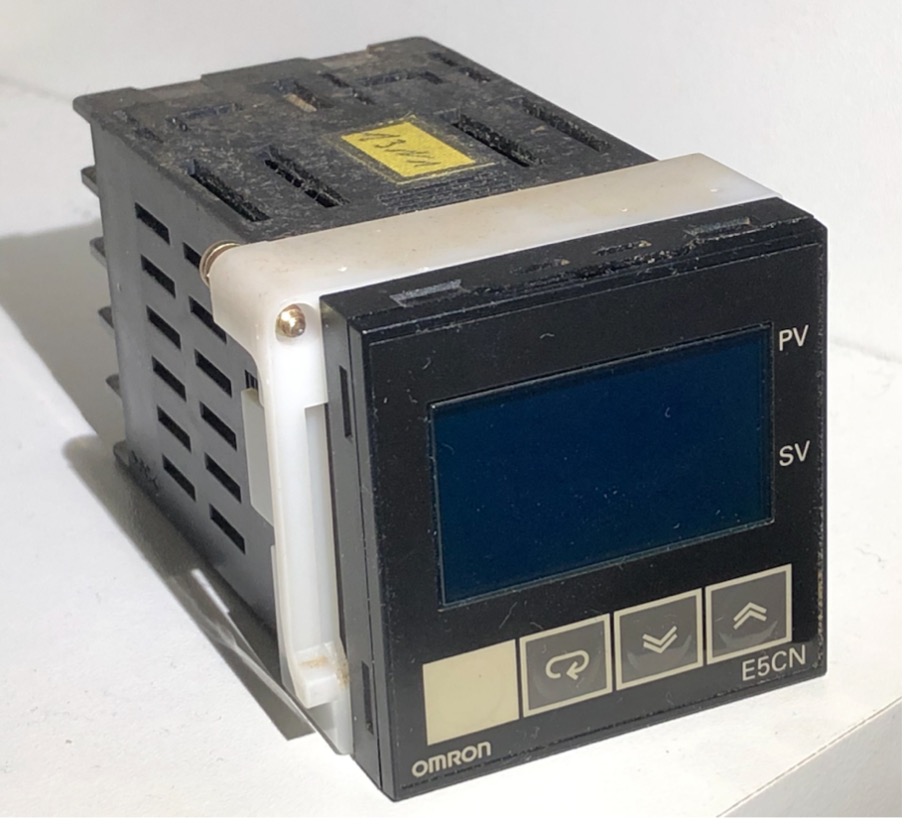
The original OMRON E5CN PIDs mounted on the roaster were working very well, but did not have the possibility to be used to control externally (lacking the RS485-Modbus).
I thought about it for years, but knew that it probably would take me more time than planned. So as my agenda is generally quite full, up to now, I never made it a priority.
I asked a few questions on the Artisan mailing list to better understand until it was clear in my mind and then I was ready:
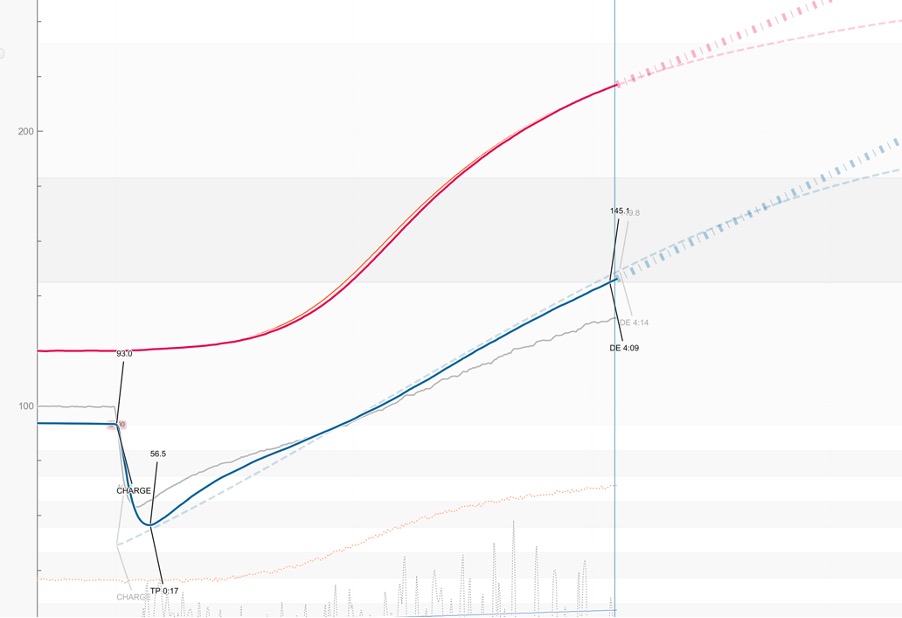
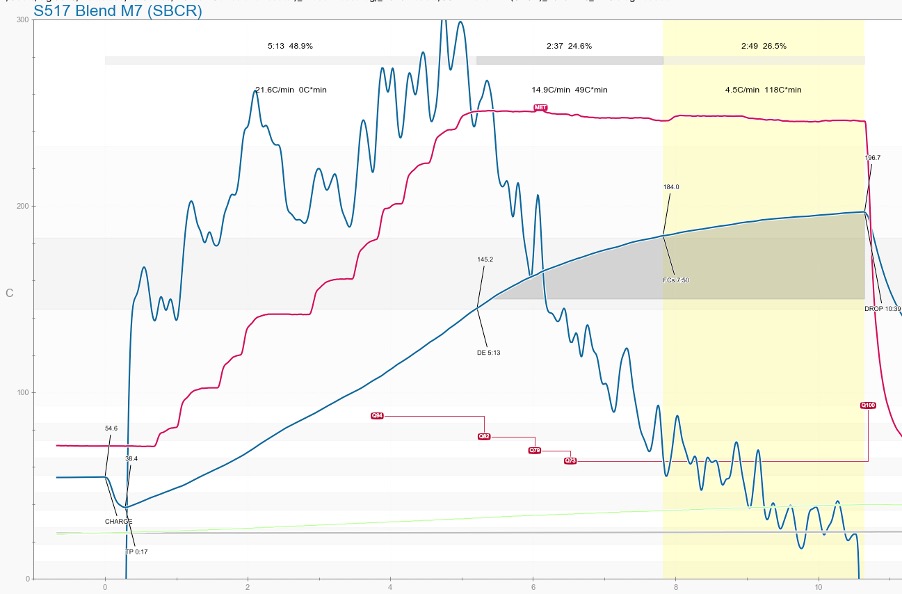
Up to now, my profiles were ET temperature steps which I was doing directly on the PID SV on the front panel. For this I had to keep the buttons pressed for a few seconds and then wait 2-3 seconds before the PID would register the new value. A typical roast profile I was doing at the time looked like the screenshot below. And I couldn’t do much better than this:
Finally, at the end of 2020, I decided to get this project started.
After hours of online searches, I decided to order a MaxWell MTA PID (model MTA-48-D-1-96-N-K) the price was pretty much unbeatable in any of my comparisons..
Finding the right model can be tricky for a non-electronic specialist as you need to understand a few things to order the right model.
(note if you read the article up to here, don’t order one yet but read further as it didn’t work well…)
Generally, when you search for PIDs, for each model there are many different options which are coded in the product reference. Each number or letter will tell you which option you have. Some of the main options you need to know are:
- Temperature input (in my case Thermocouple)
- PID Output (this is the signal controlling your heater) mine is 4-20mA
- Communication: Here I needed the RS485 / Modbus communication port to communicate with Artisan
The parameters are generally listed in the documentation. As an example for the Fuji PXF:

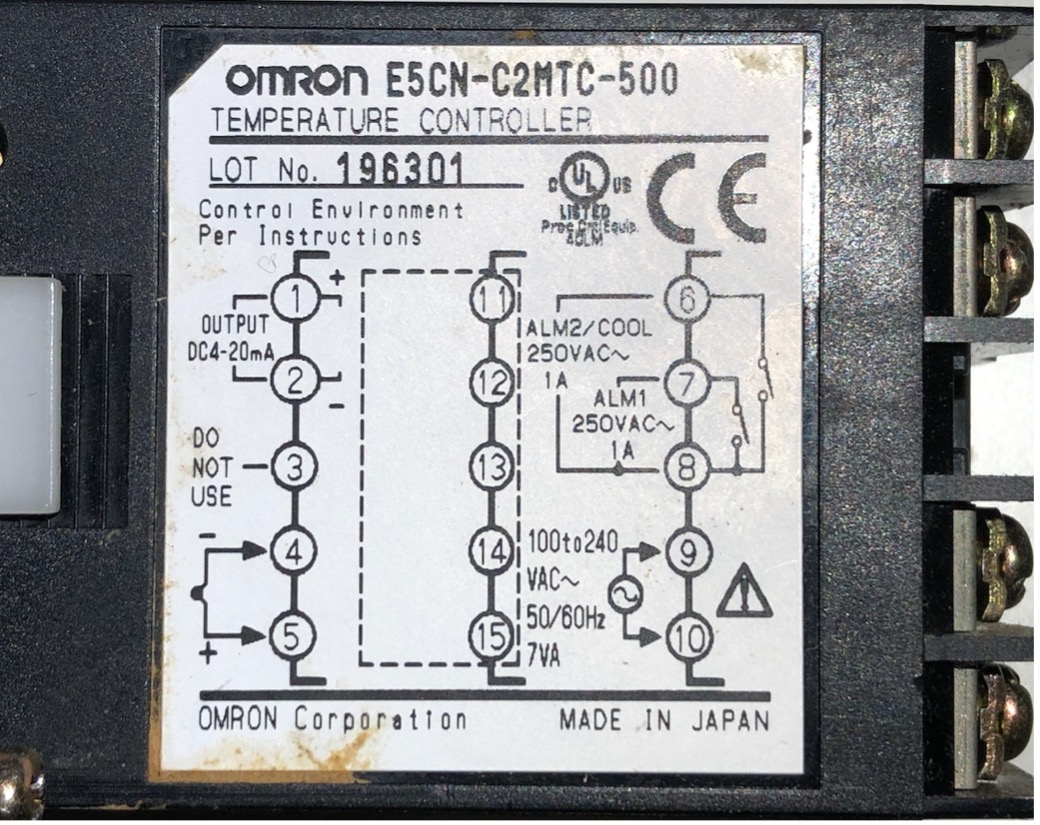
I got most of the required information by looking at the original OMRON PID on the roaster:
To connect the PID to a computer you also need an interface from the PID wiring (in my case 2 wires) to a USB. You can get many models at many different prices.
I got a USConverter RS485 Mini Premium but you can probably get a cheaper model.
I chose this one as it has an FTDI processor chip which as I understood from the Artisan mailing list was very good and likely to be “plug and play” with my Raspberry Pi or Mac (no drivers to install).
Installing the PID was very easy. Connecting it to Artisan was easy too. You just needed to:
- Select the right USB device
- Find the Modbus slave id of the PID (most generally have one by default)
- Find the Modbus communication address for each of the parameters I wanted to use
Note: the address is often in hexadecimal (HEX) format such as 0003H. If you are not familiar with it, there are many online converters you can use to find which register number it correspond to in Artisan.
Then I tried to find the right P-I-D values for the roaster. This is where it got complicated…
I first tried to quickly adjust manually the P-I-D but realized it needed to be a bit more structured. So I started an Excel document (url to xls here) to track the output relative to the changing inputs.
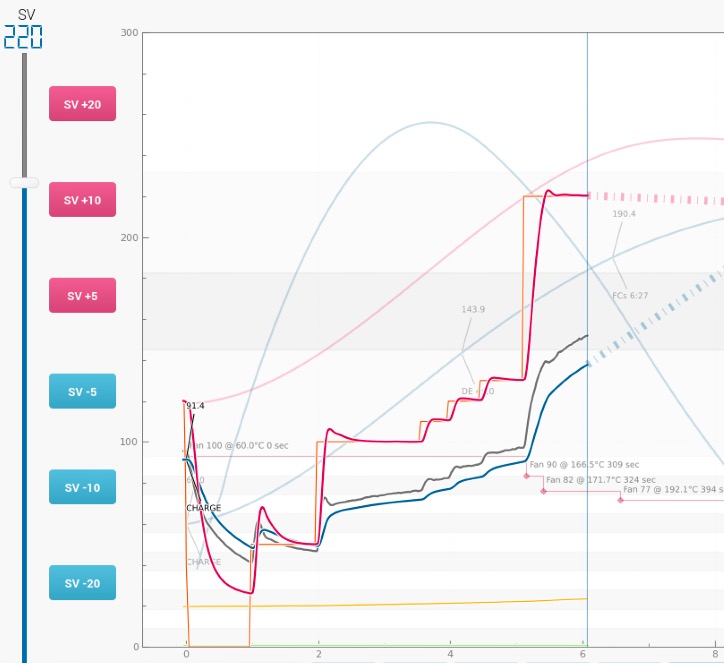
I tried manually incrementing the different values, with autotune and everything I could think of. For some of the settings I was close to being OK (but not great) - as long as SV was static. My main problem was that as soon as SV was dynamic the PV regulation would freak out:
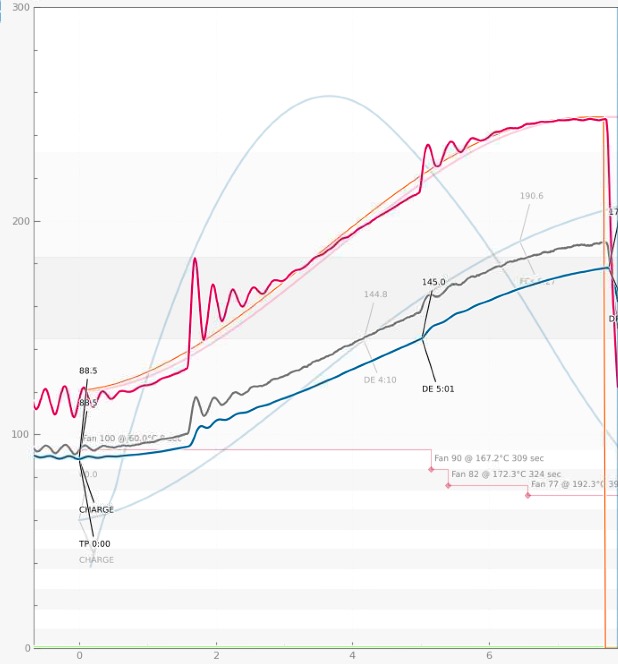
This is pretty much the best I managed at following a curve.
After days and days trying to make it work and discussing with many different people and reading everything online I could find on PID tuning I got to the sad and painful conclusions:
- The PID works as long as SV is static
- For my usage where SV is constantly changing, the MaxWell MTA is NOT fit for the purpose. It may work for other applications, but not on my fluid bed roaster.
- I probably needed to get a more expensive model…
- With the temperature control overshooting so far, my roasted coffee lost all its complexity, and was flat…
- I was frustrated!!! (so was my wife).
After discussing with Marko and Frans (check Frans’ posts on his blog, they helped me a lot) I decided to go for a Fuji electronics PXF (the PXF is the replacement for the older PXG model).
The painful part was the price at 240€ +50€ shipment which was significantly higher than the MaxWell (38$ +34$ shipping).
I ordered the model PXF4AEY2-0VM00
A couple of weeks later, it was delivered. I did not mount it for a few days as I was too afraid of spending hours my shed to make it work as with the previous one. Now it was winter with temperature going down to -6°C.
So, I started by just connecting it to my computer with a thermocouple and tested all the communication commands, making sure everything was working well.
Over the next week-end, my wife was out so I decided to try to mount it on the roaster.
Note: I was not very optimistic at this point, thinking it would take me days again to tune the P-I-D values..
When I turned the roaster on, everything worked fine, so I started by setting the SV value to 120°C and looked at the bumping curve reaching its target.
I then started the autotune function, waited for the PID to waver up and down before stabilizing. It looked great…
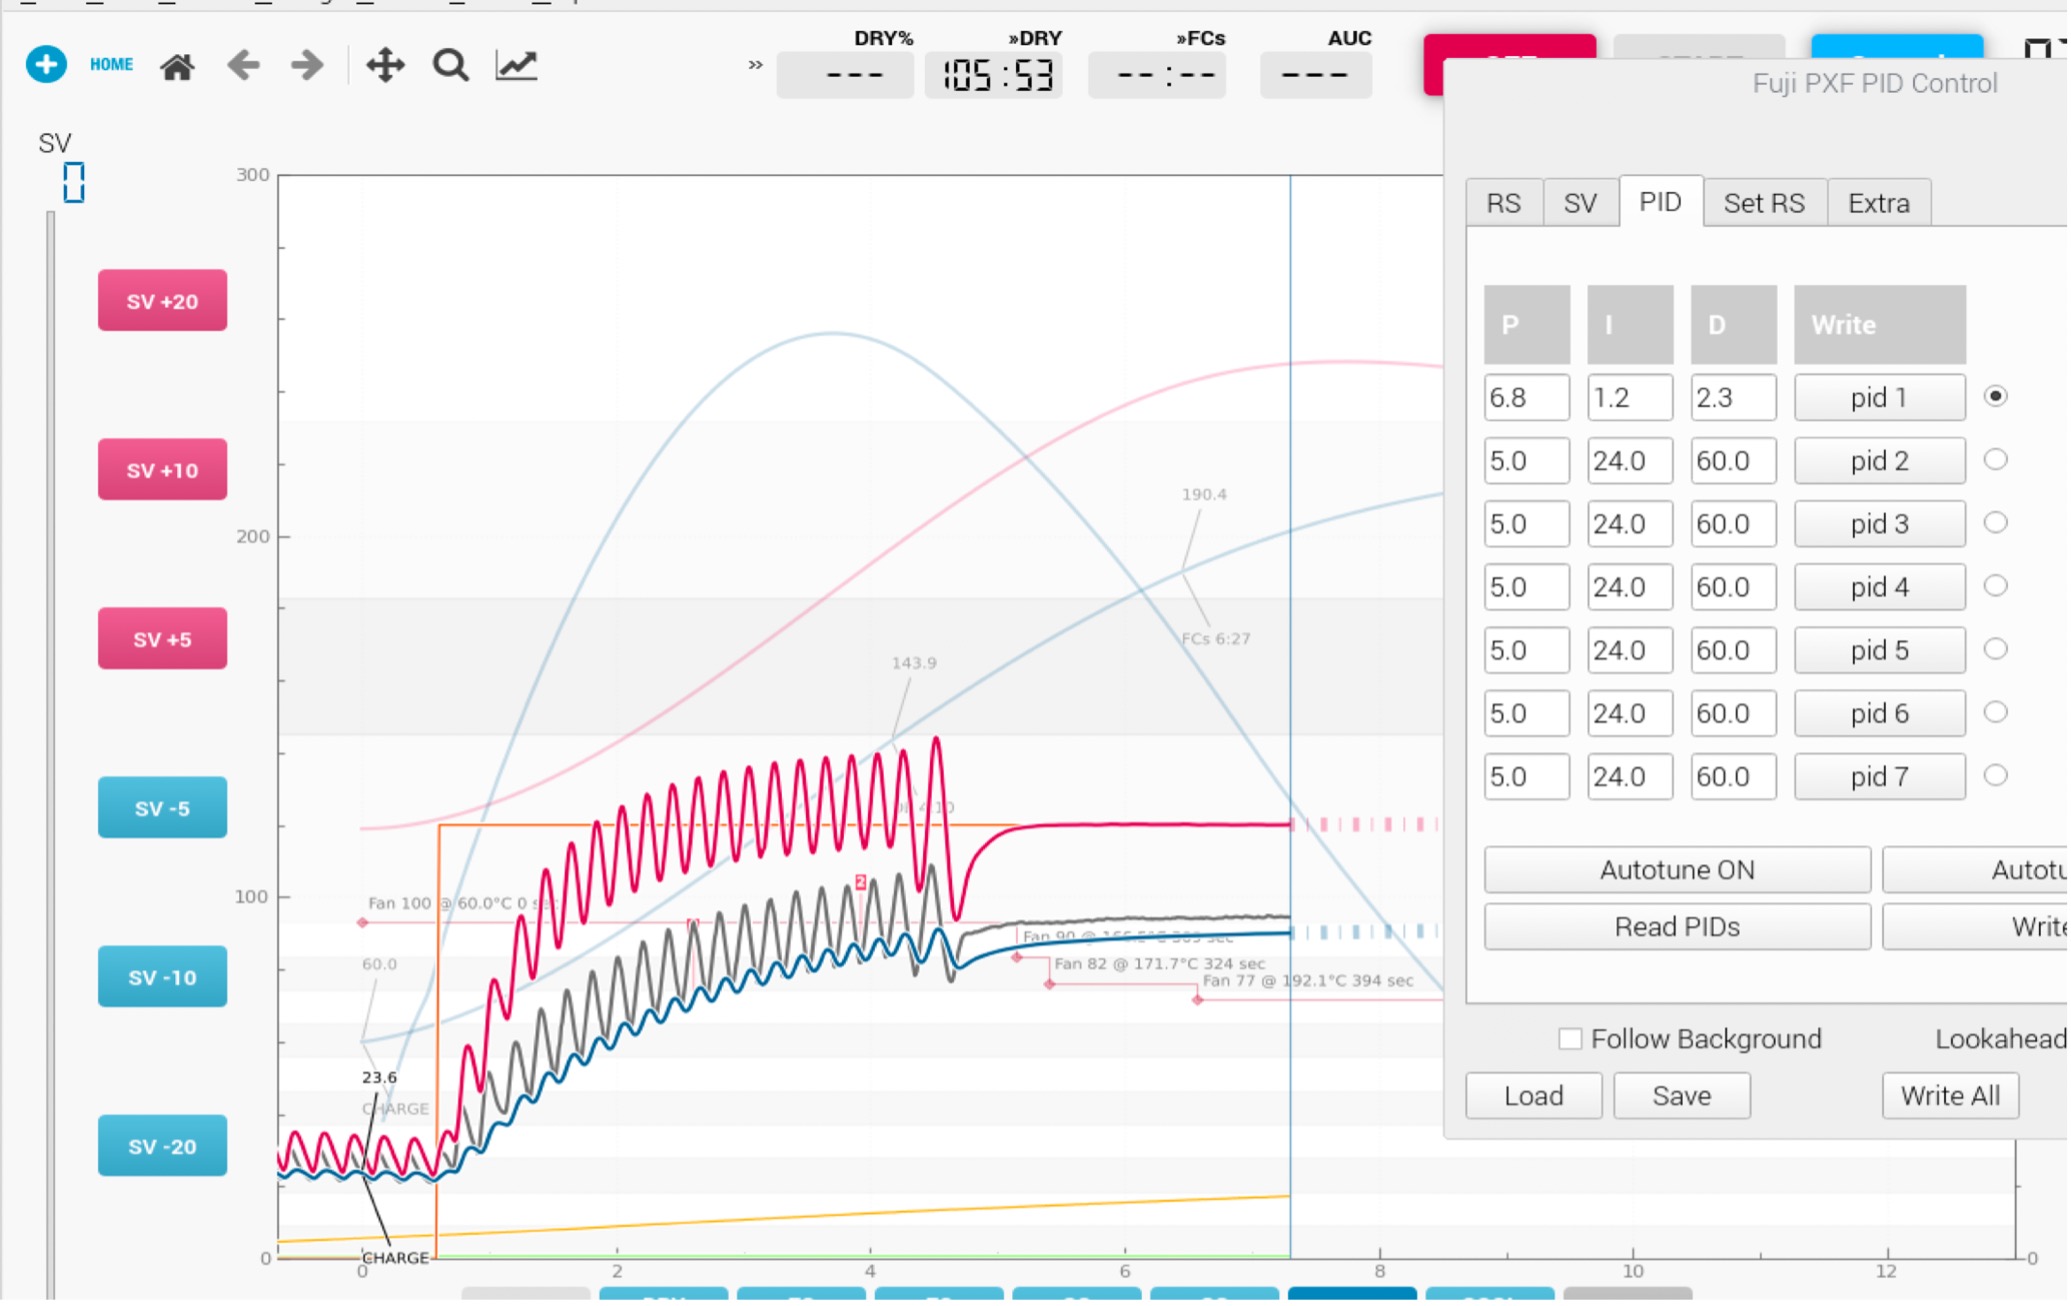
I tried changing SV to different values. Again it worked:
At this point I was quite surprised as I was expecting it to be way more complicated. So, I tried to Autotune at 150°C and then at 220°C to see if my P-I-D values would be different. They were almost the same (only 0.1 difference on the D).
So, I ran a profile with a background curve and set the PID to follow the ET SV
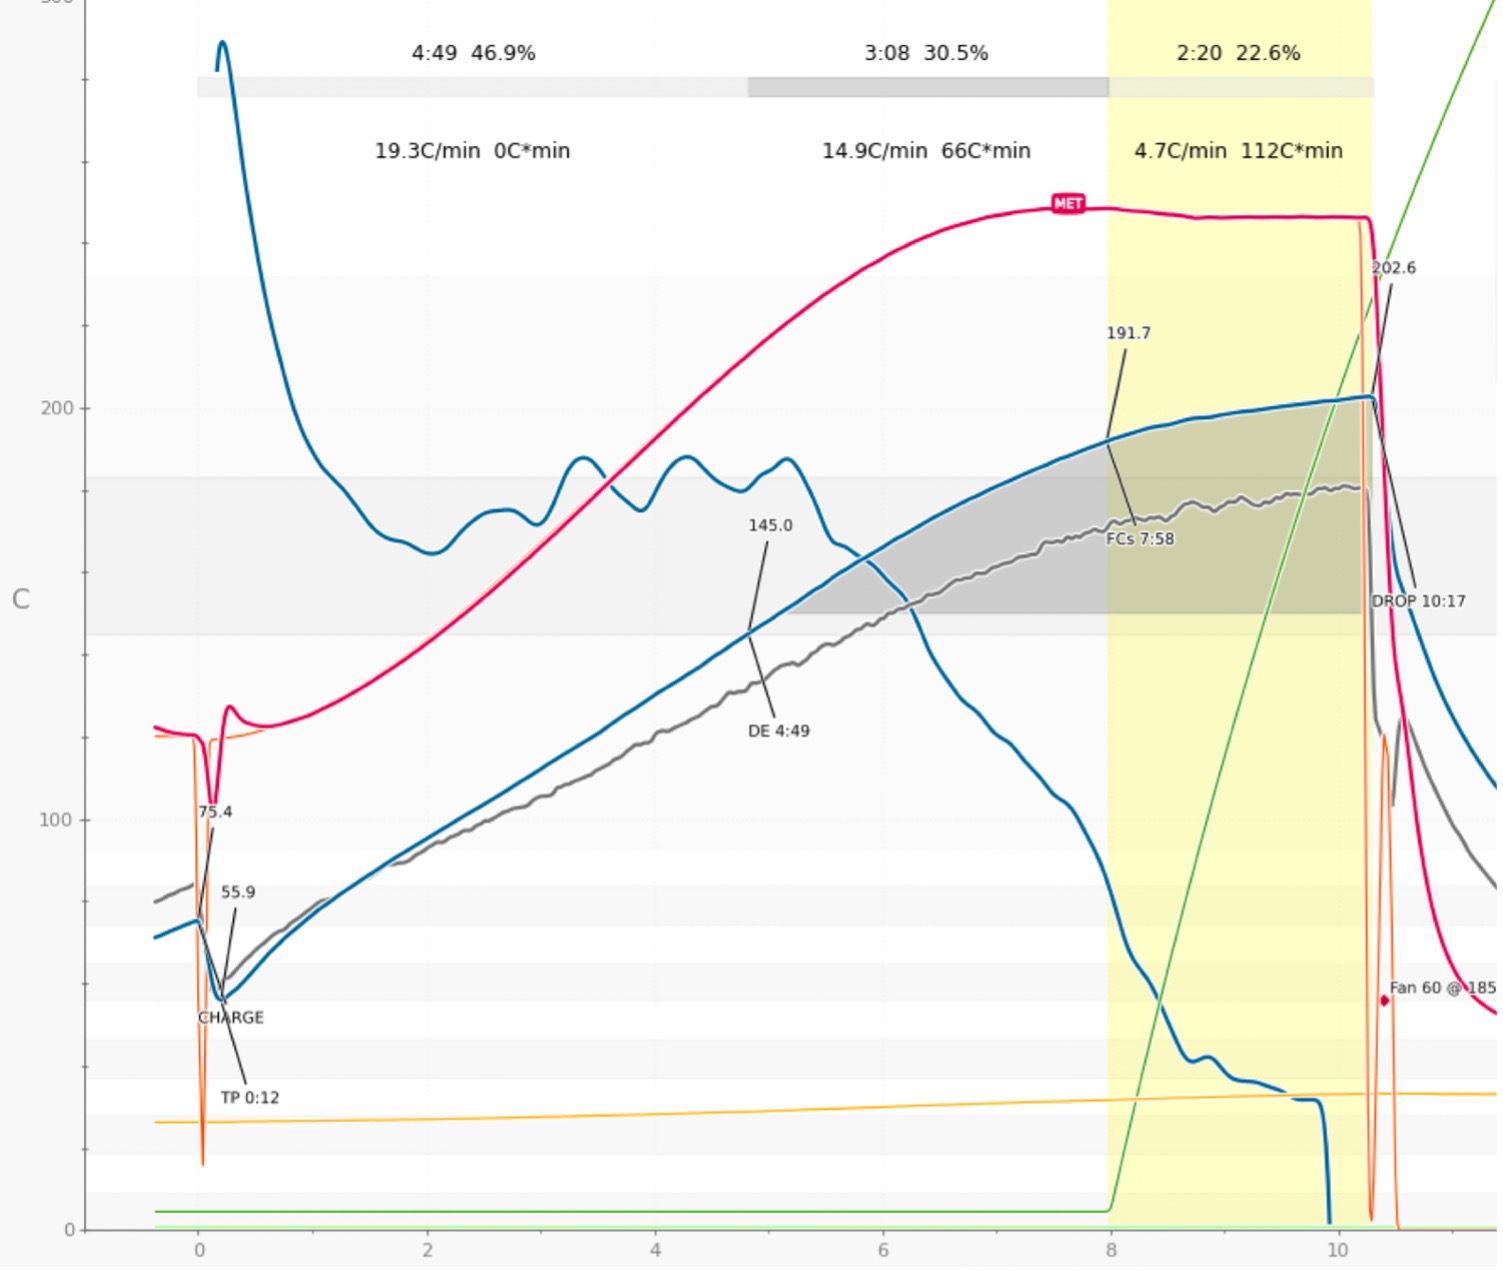
The results were way better than anything I had hoped for.
You can see the video of Artisan running a profile in PID “background mode”.
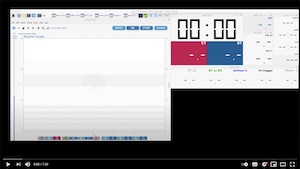
My BT curve is not yet perfect in terms of shape, but the temperature regulation is close to perfect. For the BT curve, it’s just a matter of adjusting it to get there.
Note: I think the Designer function of Artisan is not that well know but it is a very powerfull feature when used with a PID control.
You can read about the Designer in the documentation here and also watch a video by Alan here.
I also made a short video to show how to use it when working with existing curve that you want to fine tune. One of the great feature is that before you exit the Designer, you can actually save the points to a file to reuse and modify later on without starting from scratch again.
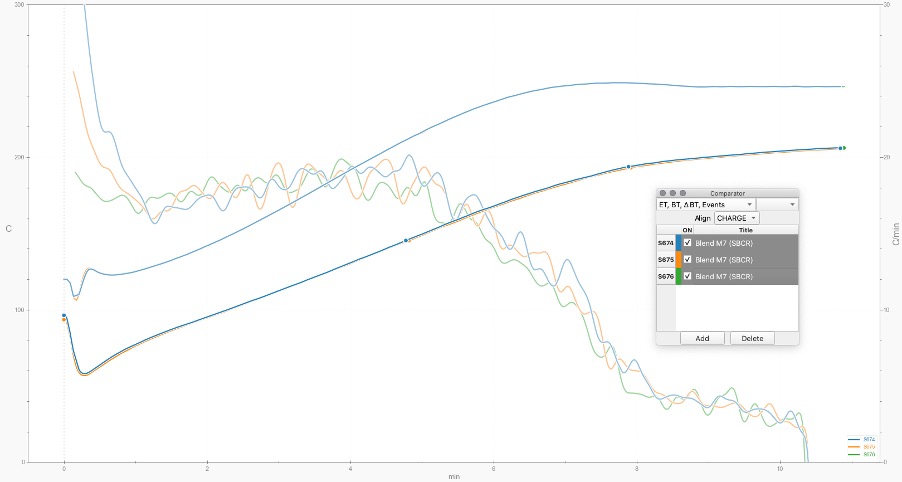
I then ran 3 roasts in a row, with everything fully controlled by Artisan without touching anything on the roaster other than marking the 1st crack and dropping at the end. Then I used the Comparator tool in Artisan, and in the visual below you can see that the profiles are pretty much a perfect match.
So, the lesson is, when you pay more you often (not always, but often) get better quality and by starting with a larger budget I would have saved myself days of frustration.
However, in the end I am very happy I got the MaxWell first If only because I learnt a lot about how PIDs work. So if you look at it this way, it was not wasted time.
Artisan configuration screenshots:
Config Screen with the Fuji PXF and USControler RS485 Mini Premium
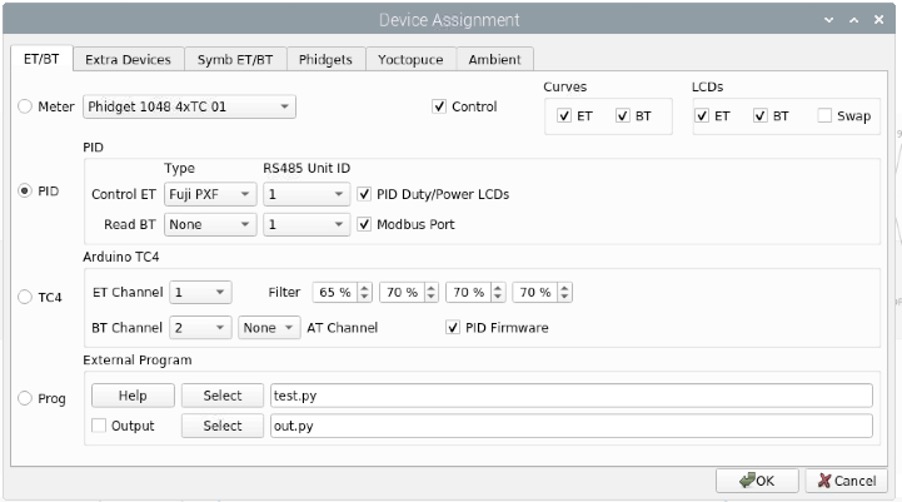
Note the “Control” box is ticked showing the Control button on the top right of the main interface
And the ports: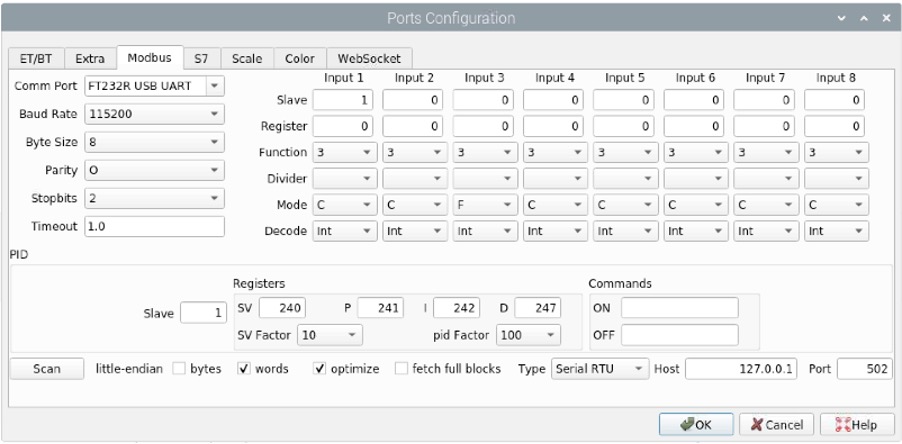
Notes on above config:
- The Comm Port selecting the right usb device (you may need to double click on it to show the dropdown selection, a single click doesn’t open it).
- The Baud Rate, Byte size and other values need to be the same as on your PID device, check the manual.
- Here the PID is set on the column “Input 1”.
- Enter the Register addresses for the different SV, P, I & D values (again look in your PID’s manual).
- For the FUJI PXF select the Type as “Serial RTU”.
In the main interface, the Control button: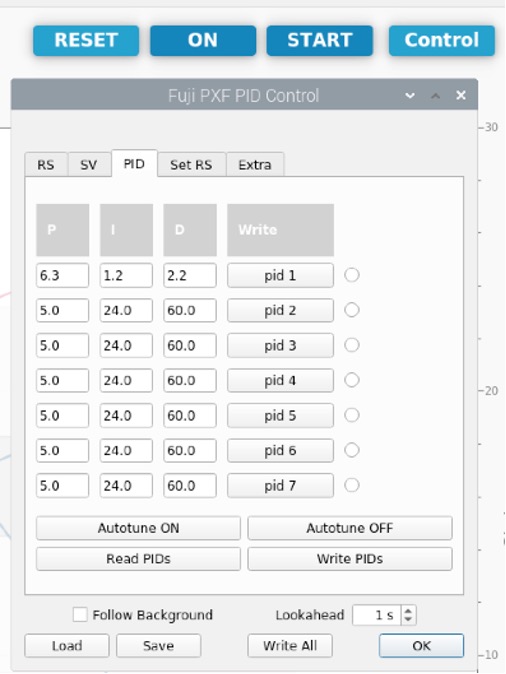
You can Read or Write the PID values, this is where you can activate the Autotune function and in the “Set RS” tab to set your Ramp/Soaks.
In “Config/Events” settings:
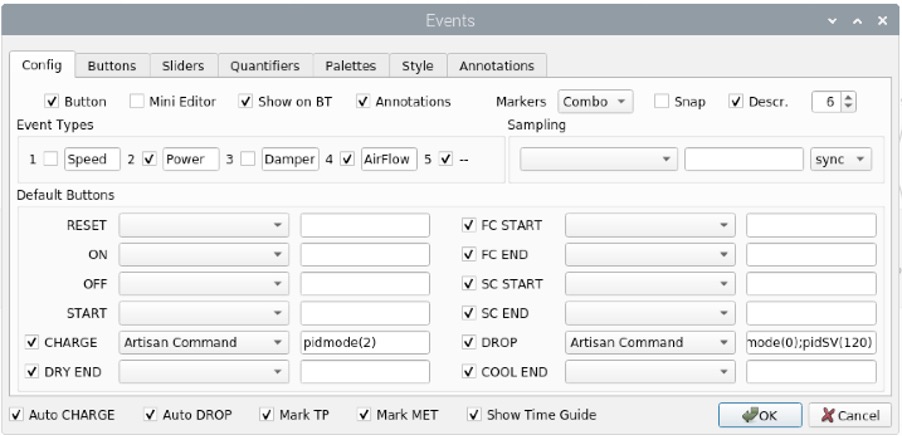
Here I set that before a roast I am in manual mode, as soon as the CHARGE is detected, “pidmode(2)” will run, which is the follow background mode.
On DROP, I set back the PID to manual with “pidmode(0)” and set SV to 120°C with “pidSV(120)”
And on the “Buttons” tab: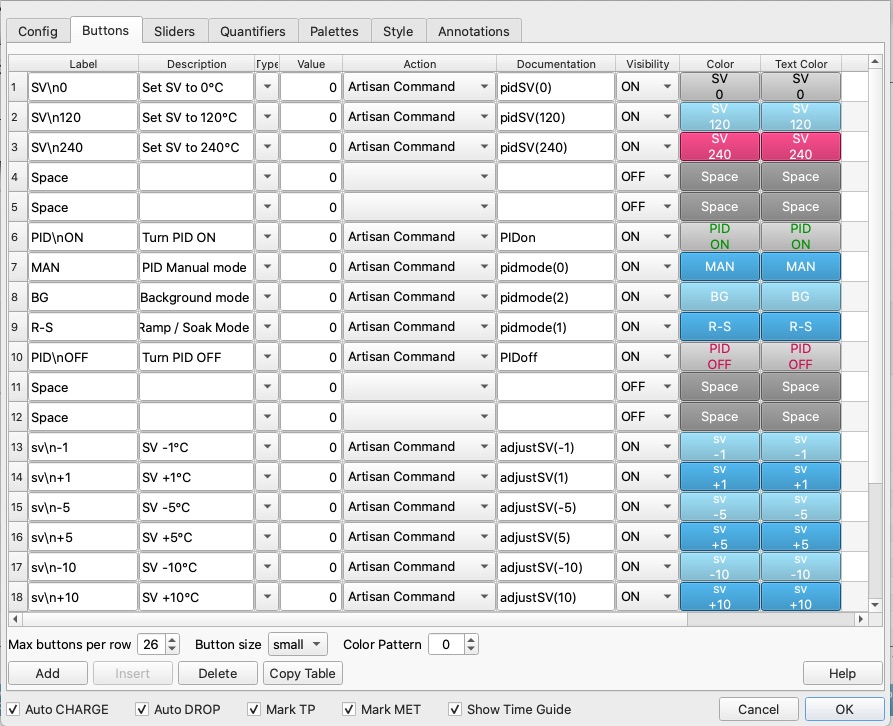
These are just a few examples you can use for inspiration…
I hope this will help you or inspire you to make better coffee with your roaster.
Again, a very big thank you, to all the Artisan contributors.
Extra links to related topics:
Modbus Negative values:
https://lists.einfachkaffee.de/hyperkitty/list/